Battery switch on travel trailer function is crucial for managing your RV’s power. Understanding how these switches work—whether single-pole, double-pole, or double-throw—is key to preventing dead batteries and ensuring your appliances run smoothly. This guide breaks down the types of switches, their operation, troubleshooting tips, and even wiring diagrams to help you become a travel trailer power pro.
We’ll cover everything from safely isolating your house and chassis batteries to selecting the right switch for your setup and performing basic maintenance. Think of this as your ultimate resource for mastering your travel trailer’s electrical system, one switch at a time.
Types of Battery Switches in Travel Trailers
Choosing the right battery switch for your travel trailer is crucial for managing your power sources effectively and safely. Different types offer varying levels of control and complexity, each with its own set of advantages and disadvantages. Understanding these differences will help you select the best option for your needs.
Single-Pole Battery Switches
Single-pole switches are the simplest type. They control power to a single circuit, typically the trailer’s house battery. They’re essentially an on/off switch for one battery. This makes them easy to install and understand, but they lack the versatility of more advanced options.
So, you’re an audiophile who travels? Awesome! Check out this guide on building the perfect audiophile travel setup for amazing sound on the go. It’s all about finding that sweet spot between portability and quality. But what if you want something more compact? Then you’ll definitely want to look at this other resource on audiophile travel setups focusing on minimalist solutions.
Remember, the key is to prioritize what matters most to your listening experience while keeping things manageable for travel. Happy listening!
Double-Pole Battery Switches
Double-pole switches offer more control, managing two circuits simultaneously. Commonly, this allows you to switch between the house battery and the vehicle’s battery (or a second house battery), enabling charging from the tow vehicle or selecting the primary power source. While offering more control than single-pole switches, they still operate as simple on/off mechanisms for each circuit.
Double-Throw Battery Switches
Double-throw switches provide the most advanced control. These switches allow you to select between multiple power sources, often connecting the house battery to either the tow vehicle’s charging system or shore power. They can also isolate the house battery completely. This is ideal for managing multiple battery banks or for more sophisticated power management.
Comparison of Battery Switch Types
| Feature | Single-Pole | Double-Pole | Double-Throw |
|---|---|---|---|
| Number of Circuits Controlled | One | Two | Two or more (selectable) |
| Complexity | Low | Medium | High |
| Cost | Low | Medium | High |
| Application Suitability | Simple battery on/off | Switching between two batteries | Complex battery management, multiple sources |
| Typical Application Example | Basic RV with one house battery | RV with house and vehicle battery | High-end RV with multiple battery banks and sophisticated charging systems |
Troubleshooting Common Battery Switch Issues
Your travel trailer’s battery switch is a critical component, ensuring you can power your appliances and systems. Problems with the switch can leave you stranded without power, so understanding common issues and how to troubleshoot them is essential for a smooth camping experience. Regular maintenance is key to preventing these problems and ensuring reliable operation.
Common problems with travel trailer battery switches usually stem from three main areas: corrosion, loose connections, and switch failure itself. These issues can manifest in various ways, from flickering lights to a complete lack of power. Let’s explore each problem and how to address it.
So, you’re an audiophile who travels? Awesome! Setting up your sound on the go can be tricky, but totally doable. Check out this guide on audiophile travel setups for tips on packing your gear safely. Then, once you’ve got your essentials sorted, head over to audiophile travel setups for advice on optimizing your sound in different environments.
Remember, a little planning goes a long way in ensuring you enjoy pristine audio wherever your adventures take you!
Corrosion
Corrosion is a frequent culprit in battery switch malfunctions. The damp environment often found around batteries and wiring harnesses accelerates the oxidation process, creating a buildup of greenish-white or bluish-white deposits on terminals and switch contacts. This buildup inhibits the flow of electricity, leading to reduced power or a complete power outage. You might notice a white powdery substance on the battery terminals or the switch itself.
Sometimes, the corrosion can be severe enough to visibly restrict the movement of the switch.
To troubleshoot corrosion, you’ll need a wire brush (preferably a brass wire brush to avoid scratching the metal), baking soda, and water. First, disconnect the battery cables from the switch. Then, carefully use the wire brush to thoroughly clean all terminals and the switch contacts. Mix a paste of baking soda and water, and apply it to the cleaned surfaces.
Let it sit for a few minutes to neutralize any remaining acid. Afterward, rinse the area with clean water and allow everything to dry completely before reconnecting the battery cables. Inspect the switch mechanism itself; if corrosion is impacting the internal parts, replacement may be necessary.
Loose Connections
Loose connections are another common problem. Vibration during travel can loosen the bolts or clamps securing the battery cables to the switch and the battery terminals. A loose connection creates resistance, leading to reduced power or intermittent power failures. You may notice that wiggling the cables slightly affects the power supply.
Addressing loose connections is relatively straightforward. Tighten all the bolts and clamps securing the battery cables to both the switch and the battery terminals. Use a wrench or pliers to ensure a secure connection. If the bolts are stripped or the clamps are damaged, they should be replaced. A visual inspection of the terminals and the clamping mechanisms will help identify loose or damaged parts.
Switch Failure
Over time, the battery switch itself can fail. This could be due to wear and tear, corrosion affecting internal components, or simply age. Symptoms of switch failure can include a complete lack of power, inability to switch between batteries, or an inability to completely disconnect the batteries.
Troubleshooting a failed switch involves testing the switch’s functionality. If you have a multimeter, you can test the continuity of the switch in its various positions. If the switch consistently fails to make a connection or shows signs of internal damage, replacement is the only solution. When replacing the switch, ensure that you choose a switch with the correct amperage rating for your battery system.
Pay close attention to the wiring diagram during the installation process to avoid incorrect connections. A new switch should be installed using clean, properly sized bolts and nuts, and connections should be tightened securely.
Regular Maintenance and Inspection
Regular inspection and maintenance are crucial for preventing problems with your battery switch. At least once a year, or more frequently if you use your travel trailer extensively, visually inspect the battery switch, terminals, and connections for signs of corrosion, looseness, or damage. Cleaning the terminals and connections with a wire brush and baking soda paste, as described above, should be part of this regular maintenance routine.
This proactive approach can prevent minor issues from escalating into major problems and costly repairs.
Wiring Diagrams and Schematics
Understanding the wiring of your travel trailer’s battery system is crucial for safe and reliable operation. Properly wired battery switches prevent electrical shorts, protect your appliances, and ensure your batteries are charged correctly. This section will illustrate typical wiring configurations for both simple and more complex setups.
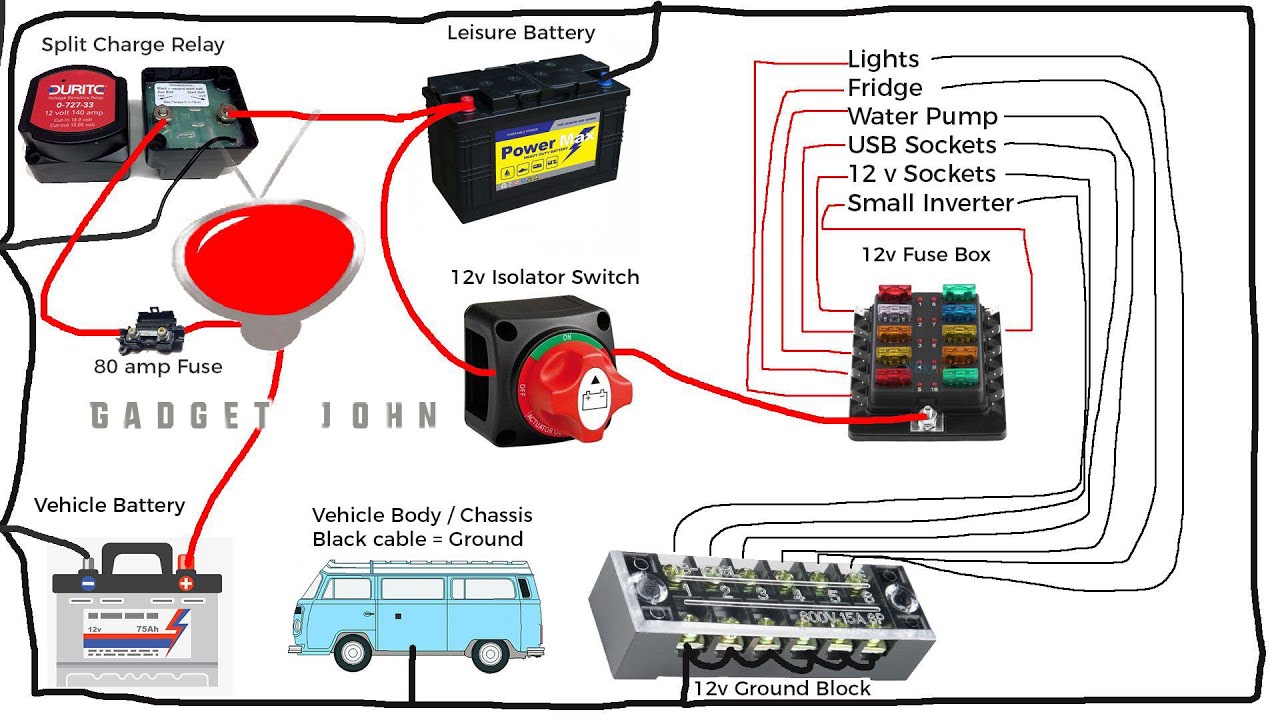
Simplified Battery Switch Wiring Diagram
This diagram shows a basic setup with one battery and a single battery switch controlling power to the trailer’s 12V system. Imagine a simple rectangle representing the battery, labeled “Battery 1” with a positive (+) and negative (-) terminal. A line connects the positive terminal to one side of a switch, represented by a simple switch symbol. Another line connects the other side of the switch to the positive bus bar of the trailer’s electrical panel.
A separate line connects the negative terminal of the battery directly to the negative bus bar of the trailer’s electrical panel. This configuration provides a simple on/off control for the entire 12V system. It’s important to note that the negative connection is always directly connected, ensuring a complete circuit when the switch is engaged.
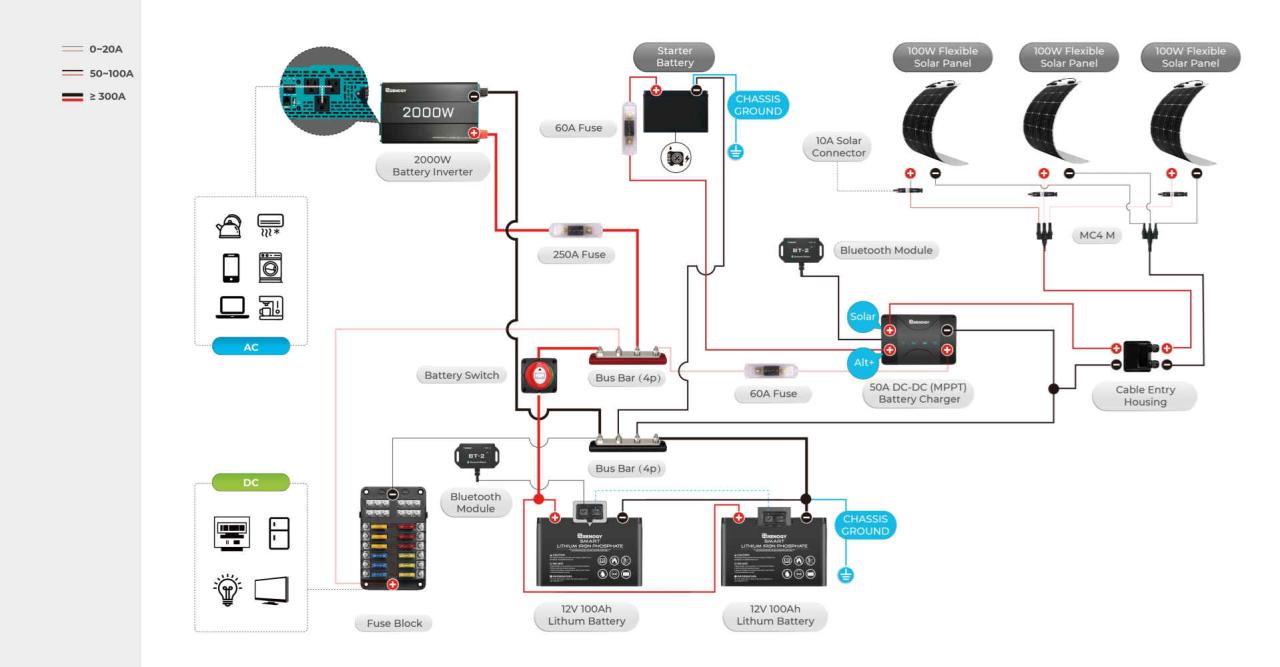
Complex Battery Switch Wiring Diagram with Multiple Batteries and Components
This diagram expands on the basic setup by incorporating two batteries and additional components like a solar charge controller and a battery charger. Visualize two battery rectangles labeled “Battery 1” and “Battery 2”, each with positive and negative terminals. Both positive terminals connect to the input sides of a dual-input battery combiner, a component that merges the current from both batteries.
The output of the combiner connects to one side of the battery switch. The other side of the switch connects to the positive bus bar. The negative terminals of both batteries connect directly to the negative bus bar. A solar charge controller connects to Battery 1, representing a solar panel input. A battery charger connects to Battery 2, representing shore power or generator input.
This setup allows for charging from multiple sources and combining the power from both batteries to supply the trailer’s 12V system. The battery switch controls the flow of power from the combined batteries to the trailer’s electrical panel.
Best Practices for Wiring a Battery Switch
Safe and efficient wiring is paramount. Use appropriately sized wiring for the amperage of your system. Always use properly insulated wires and crimp connectors to prevent shorts and corrosion. Ensure all connections are tight and secure. Use appropriately sized fuses or circuit breakers to protect the wiring and components from overcurrent.
Clearly label all wires and components for easy identification and troubleshooting. Consider using a dedicated ground bus bar to connect all negative wires for a cleaner and more efficient installation. Before connecting any wires, disconnect the negative terminal from the battery to prevent accidental shorts. After completing the wiring, carefully test the system to ensure all connections are correct and functional.
Always consult a qualified electrician if you’re unsure about any aspect of the installation.
Battery Switch Selection and Installation: Battery Switch On Travel Trailer Function
Choosing and installing the right battery switch is crucial for safe and efficient power management in your travel trailer. The wrong switch can lead to electrical problems, potentially damaging your batteries or other components. This section guides you through selecting the appropriate switch and installing it correctly.Selecting the correct battery switch depends primarily on the size and type of your batteries.
Consider the amperage draw of your appliances and the total capacity of your battery bank. Oversizing the switch is generally preferred for safety and longevity.
Battery Switch Selection
The selection process involves considering several key factors. First, determine the total amperage of your battery bank. This is the sum of the amperage ratings of all your batteries. Next, consider the maximum amperage draw of your appliances and systems. You’ll need a switch with a rating that exceeds both the battery bank amperage and the maximum appliance draw.
For instance, if your battery bank has a total of 200 amps and your largest appliance draws 50 amps, a 300-amp switch would provide a comfortable safety margin. Finally, consider the type of switch. Common types include manual switches, which require manual operation, and automatic switches, which offer more sophisticated control, often with remote operation. The choice depends on your budget and desired level of convenience.
Manual switches are more affordable and reliable while automatic switches provide greater convenience and sometimes protection from overloads.
Battery Switch Installation Steps
Installing a battery switch involves several steps, starting with disconnecting your batteries. This is a critical safety precaution to prevent accidental shocks or short circuits.
- Disconnect the Battery: Before beginning any work, disconnect both the positive (+) and negative (-) terminals from your batteries. Use insulated tools to prevent accidental shorts.
- Choose a Mounting Location: Select a location for the switch that’s easily accessible, well-ventilated, and protected from the elements. A common location is inside a battery compartment or a nearby storage area.
- Prepare the Mounting Surface: Clean and prepare the mounting surface to ensure a secure and level installation. This might involve drilling holes for mounting screws or using existing holes if applicable.
- Mount the Switch: Securely mount the switch using appropriate fasteners. Ensure the switch is firmly attached and will not vibrate loose.
- Connect the Battery Cables: Connect the battery cables to the switch terminals. Positive (+) cables connect to the positive (+) terminals and negative (-) cables connect to the negative (-) terminals. Use appropriately sized cable lugs and tighten the connections securely.
- Reconnect the Battery: After completing all connections, reconnect the battery terminals. Always reconnect the positive (+) terminal first, followed by the negative (-) terminal.
- Test the Switch: Test the switch by turning it on and off, checking that power is flowing correctly to your appliances and systems. Ensure all connections are secure and that no sparking or unusual sounds are present.
Connecting Battery Cables
Properly connecting the battery cables is critical for safety and performance. Use appropriately sized battery cables and lugs. The cable size should match the amperage rating of the switch and the battery bank. Crimp the lugs onto the cables securely using a crimping tool. Ensure the connections are clean and free of corrosion before attaching them to the switch terminals.
Tighten the terminal screws securely, using the correct torque specifications to avoid damaging the switch or the cables. Apply a dielectric grease to the connections to prevent corrosion and ensure a reliable electrical contact. A common mistake is under-tightening the connections, which can lead to overheating and potentially a fire hazard. Visual inspection should show no exposed wires or loose connections.
Impact of Battery Switch on Travel Trailer Systems
A battery switch is the central control point for your travel trailer’s power, acting as a gatekeeper between your batteries and the various systems demanding power. Understanding its impact on different systems and overall energy efficiency is crucial for maximizing your RV’s functionality and extending the lifespan of your batteries.The battery switch directly controls the flow of power from your batteries to the various systems within your travel trailer.
With the switch OFF, all systems are disconnected from the battery power source, preventing unwanted drain and potential damage. When ON, the power flows, enabling the operation of lights, appliances, and other components. The type of switch (e.g., single, dual, or multi-bank) will determine the specific configuration of power distribution.
Battery Switch and System Operation
The operation of many travel trailer systems is completely dependent on the position of the battery switch. With the switch in the “OFF” position, nothing will work – no lights, no water pump, no refrigerator (if it runs on 12V DC). In the “ON” position, the power flows to all connected 12V DC systems. For example, turning on a light will draw power directly from the battery, and this is controlled by the switch.
Similarly, the water pump only functions when the battery switch is activated, providing the necessary power to pump water from the tank. Appliances such as a 12V refrigerator will also be powered by the battery, and their operation is similarly contingent on the switch.
Battery Switch and Battery Life
A properly used battery switch significantly impacts battery life and charging efficiency. Leaving the switch in the “ON” position when the trailer is not in use allows for parasitic drain, which slowly depletes the battery over time. This parasitic drain is caused by small, constant current draws from things like clocks, carbon monoxide detectors, or even the control boards of some appliances, even when they aren’t actively being used.
Conversely, when the switch is OFF, these small drains are eliminated, preventing premature battery discharge and extending their lifespan. Furthermore, ensuring the switch is OFF during charging allows for more efficient charging, as there’s no current being diverted to running systems.
Energy Consumption Comparison, Battery switch on travel trailer function
The energy consumption of various systems changes dramatically depending on the battery switch’s position. Consider a scenario with a 100 amp-hour battery. With the switch OFF, the energy consumption is minimal, typically only a few milliamps per hour due to parasitic loads. This means the battery will retain almost its full capacity for an extended period. However, with the switch ON, the consumption drastically increases.
For instance, running a water pump might draw 5 amps, while lights could draw another 2 amps, and the refrigerator 3 amps. Over several hours, this can significantly drain the battery. This difference highlights the importance of managing the switch to optimize energy usage and battery life. For instance, a small LED light might use 0.5 amps, while a larger incandescent light might consume 2 amps or more.
The difference is considerable.
Mastering your travel trailer’s battery switch is more than just flipping a lever; it’s about understanding your RV’s power system and ensuring reliable operation. By understanding the different switch types, their functionality, and common troubleshooting steps, you’ll be prepared to handle any power situation on the road. Regular maintenance and a little preventative care will keep your system running smoothly for many adventures to come.
Happy travels!
FAQ Explained
What happens if my battery switch is corroded?
Corrosion can lead to poor connections and potentially dangerous overheating. Clean the terminals with a wire brush and baking soda solution, then apply a corrosion inhibitor.
How often should I check my battery switch?
Inspect your battery switch and connections at least once a year, or more frequently if you’re in a humid or salty environment.
Can I use any type of battery switch in my travel trailer?
No, the appropriate switch depends on your battery configuration (size and voltage). Consult your trailer’s manual or a qualified electrician.
My battery switch is stuck. What should I do?
Try lubricating the switch mechanism with a penetrating lubricant. If it remains stuck, replacement might be necessary.
